Thursday, February 26, 2015

Darned Socks


Do you know what this is?
It's a darning egg.

 Most people in this day and age have no idea what a darning egg is, let alone what it is used for. In the modern era of disposable items, especially clothing darning has become a lost art. At the turn of the century every household had at least one darning egg and darning was an essential domestic skill. 

  So what is darning? Darning was a method used commonly to repair holes or worn thin areas of socks and stockings before the time when socks and hose were disposable. For hundreds of years this task fell to servants, maids and it was even included in the duties of nurses at one time.
Image property of Getty Images

I found this beautiful picture online that illustrates how in the not so distant past darning socks was part of the normal duties of a nurse.

Darning at one time was considered a skill necessary to life. Often viewed as a womanly skill, it is worth noting that in the First and Second World war soldiers darned their own socks in down time. It was a part of life when socks and hose were expensive and not so easily replaced. 

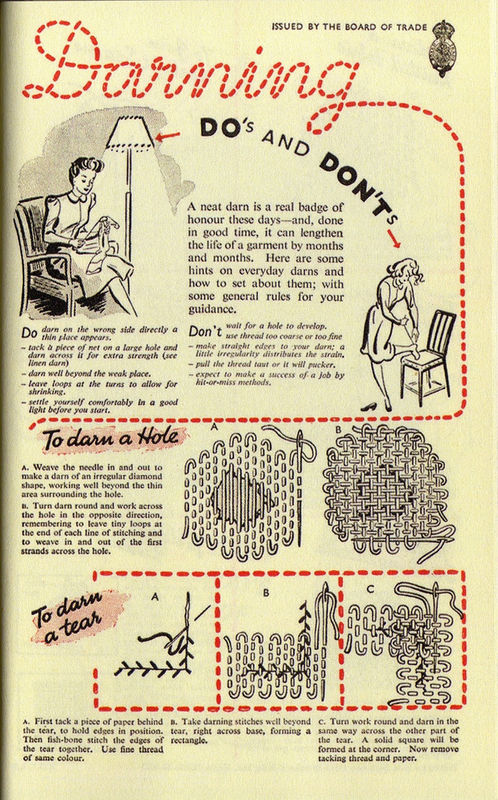
A page on darning from a vintage manual

  The art of darning though is not entirely lost, there is a large movement towards learning this skill again. I have taken the time to sift through all the information new and old on the internet to learn the skill. 

Why? 

  Two reasons, I like learning old skills, my hubby seems to think it has something to do with my paranoia about being prepared for when the zombie apocalypse hits. Joking aside I don't like just throwing stuff away, I happen to be a bit of a pack rat, but I think it comes from growing up with grandparents who grew up in the war time who taught me that if you could fix it, it was still good. 
   The second reason came out of necessity and thrift. I wear compression socks to work, 12 hour shifts on my feet have made it somewhat of a necessity. After much trial I found some great socks, a wool and bamboo blend that allows the feet to breath even when being crammed into hot leather shoes for hours on end. The down side to these miracle socks is they are expensive, at $25.00 a pair it's not like they are disposable, so when holes appear in the toes I am just a little reluctant to simply toss them out. So I learned to darn my socks.

My sock pile

  Back to the darning egg, it is inserted into the toe or heel of the sock to spread the fabric so you can see the area you are working on a give you a firm surface to work with. In the beginning I used a tennis ball but found the fuzzy surface often got sewn into my sock. Darning eggs are relatively cheap, about $10.00 for a decent wooden one, which is less than half the price of a new pair of socks and it will last forever. Darning is a relatively easy thing to learn and while it can be a touch time consuming if you have a pair of socks you absolutely can't live without or can't afford to replace it's a life saver. 
Let me walk you through it:

My socks tend to wear out in the toe are pretty fast. 
It's better to darn your socks before you have a huge hole, as it becomes trickier.
See the worn area? This is what needs to be fixed.

First order of business is to lay down a border of stitches around the weak area.
Make sure these stitches are put into the fabric of the sock that is still intact.

Next lay down verticle lines of thread over the weak area.
Anchor these in with stitches above your border stitches well into the "good" fabric of the sock.
Cover the weak area entirely and continue stitching into the "good" fabric beyond the weak area.


Now begin to stitch horizontal to the weak area. 
When you reach the vertical thread weave your thread through them.
You are basically creating a grid.
Continue until you cover the entire area and then into the "good" fabric into your boarder stitches.
Knot off your thread and you are done!

My socks are all ready to go.

  This works great for heavier socks like skiing and hiking socks, or heavier compression socks like mine. I like to use embroidery floss as it is heavier and easy to work with, I split the floss in half and use three strands when I darn. Using a different color floss is helpful as you can easily see your stitches as you work. Besides who cares if it doesn't match, no on is going to see your mended toes while your shoes are on.

  It may seem like a ridiculous amount of work but I actually enjoy darning. It's pretty mindless work that keeps my hands busy so it's perfect for doing in front of the TV or on a quiet morning in a sunbeam when I want to think about school while accomplishing something. It may be an old skill but it is a useful one, besides you never can be too prepared for the zombie apocalypse!


Sunday, February 1, 2015

Super Sunday

  While most people are in front of a television right now, I'm getting ready for work. Yep, I volunteered to work Superbowl Sunday in a trauma center, in the city the game is being held in, smart me. In reality, while I enjoy football, I am just not that married to any team and have yet to make Superbowl Sunday the third most important day of the year next to Christmas and Thanksgiving. Honestly, I don't mind working tonight, the die hard fans get to have their fun and I get a few bucks in my pocket.

  Also did I ever tell you nurses love to potluck? Oh yes and we are very, very good at it. The key to a good potluck is lots of different foods that can all be eaten on the go. It is not uncommon to see several crock pots bubbling with delicious contents in the unit on nights like these. My problem is that I found out about the potluck last night, when I worked and had no time to plan due to the need to sleep so I could get up and go to work all over again. No worries I have a fail proof solution that works every time, home made salsa.

  Who doesn't love a good drippy salsa with plenty of good crisp chips on the side? Easy to grab on the go and stays fresh the whole night. It's super easy, the key is just good, fresh ingredients.

  Cilantro is always around in my house, it's used in a lot of  Asian cooking and we live in the Southwest, Mexican makes it on to the menu once in awhile. 

Fresh jalapenos are essential.
If you don't like your salsa super hot remove the seeds and only add the pepper.
But it is a must, it adds a nice fresh flavor.

  This recipe isn't really a recipe at all, you just toss everything in the blender until it's the consistency you like, then chill it in the fridge for a few hours to let the flavors meld. I made this batch in the morning when I got home, put it in an old sauce jar and stuck it in the fridge.  Everyone will think you worked forever chopping and mixing, you don't have to let them know how easy it was. It'll be our little secret.


Blender Salsa "Recipe"

  • 1- 14 oz can diced tomatoes
  • 1- 10 oz can original Rotel
  • 1/2 small onion, roughly chopped
  • 2 cloves garlic, peeled and smashed
  • 1/2-1 jalapeno,
  • 1/4 teaspoon ground cumin
  • pinch of sugar
  • salt to taste
  • small to medium size handful of cilantro, washed
  • juice of 1 lime (fresh! The stuff in a bottle is not the same)
 Toss all ingredients into a blender or food processor and whiz until desired texture. Add salt to taste and chill for 3 - 4 hours to let the flavors blend. Serve cold with chips or on your favorite dishes.


All packed up with some of my favorite chips!


Friday, January 30, 2015

Rain Day

 I love rainy days and I love rainy days off  even more! I know it sounds strange but living in Arizona has made me appreciate the rain. When I lived in Canada rain was an ever present thing, we often had more grey days than sun, but here in AZ rainy days are a treat. The rain here seems to come down in a hurry then leave just as fast, so when I have a day where it rains softly on and off for the whole day I savor it!

  There is nothing like a soft drizzle that pitter-pats off the skylights and trails down the windows. It creates a soft white noise for the day and puts me into putter mode. I just want to do as little as possible and enjoy the wet that is outside my window.

 Here are my tips on how to enjoy a rainy day:


  The right supplies are essential to enjoying a good rainy day, the madeleines I made yesterday pair perfectly with a cup of tea and their light lemon color breaks up the grey of the day perfectly. I stayed in my pajama's late after the hubby left for work and enjoyed a second cup of tea and a little plate of these goodies. Don't be in a hurry, just enjoy and quit fretting about calories they don't exist on rain days.


  Comfort food is essential as well. Today it's cool enough to wear a sweater and a warm bowl of something steamy and comforting pair well with the day. Lucky for me the hubby made lamb curry a few days ago and the left overs piled over a soft, pillowy bed of rice is just the thing to put a damper on the chill in the house. Find something to savor, that makes you happy and enjoy!


  A post lunch nap is essential if it is still raining. The best sleep is had when one drifts off listening to the soft fall of rain, I always take advantage of these sort of days. After all they only come around 
once in a while.


  After napping I inevitably feel some urge to do something, but nothing to involved. Something to keep the hands busy but that allows the mind to wander. Knitting is usually the go to activity for me in times like this. I always have about three projects on the go and it's not unusual to swap between them on a day like this. Some like to enjoy a good book, I used to be that way but lately I have had my fill of books and reading thanks to school. Besides there is something intensely therapeutic about the feel of soft, smooth yarn slipping through the fingers and the soft click of needles as they magically turn what is essentially a ball of string into a recognizable object.


  I've been working on this scarf for a few months now, so it seemed like the perfect time to pick it up again. It's just knits and purls worked into a nice chevron pattern, easy enough to keep the hands busy, involved enough to keep me from getting bored. It's a handsome pattern for a guys scarf which can be hard to find. I found it on Ravelry by Wyndlestraw Designs.  

Beckenham Scarf
© Moira Ravenscroft, 2013
    Why don't you check out the website on your next rainy day and get some inspiration on how to enjoy.


Madeleines

  Madeleines, I think I have an obsession with these tiny bites of buttery, lemony goodness. Unfortunately here in the States most people know these little cakes as prepackaged treats that are most commonly found at the register in Starbucks.


  These packaged goodies, while tasty, are about as close to real madelienes as corn syrup is to maple syrup. A nurse I used to work with would always walk into report with her cup of joe in hand and a package of these "cookies" as she used to call them. She would always offer one to me which I would politely turn down. One day she asked me what was wrong with her "cookies". Oh where to begin!

  So first things first, madeleines are not cookies, but small cakes. Secondly they should be made fresh, eaten still warm and dunked in steaming cups of coffee not shaken from a plastic wrapper! Third real freshly baked madeleines just have this certain je ne sais quoi,they have a slight crust on them from baking and a less crumbly more spongy texture. Oh and the butter, the rich buttery flavor you get when they are actually made with real butter.


  Being unable to find an acceptable approximation of the real thing I of course made it a mission to learn how to make these little bites of french goodness for myself. As I quickly learned the recipe is deceptively simple and, as with any French recipe, there is an art to making these little devils that only comes with time and experience but the end result is so worth it!

  So let me tell you what I have learned from trial and error when making these little beauties.

   First be patient and attentive, madeleines are not cookies, you cannot rush them together, plop them out and expect them to turn out. The batter should be rested for at least 3 hours, longer if you can wait. I have tried making them with unrested batter but found the texture just wasn't right. 

  Secondly treat your ingredients with care. Eggs absolutely must be a room temperature, this is because you don't (shouldn't) use any leavening agents when making madeleines. All your air is going to come from the eggs you beat and room temperature eggs beat up much better than cold ones. If you forget to leave your eggs out don't fret, simply plop them into a bowl of warm water and let take a bath. Also be choosy about your butter, as these cakes are going to get much of their flavor from it, you want one that you can actually taste. That being said I usually buy European style or Irish butter, trust me you can get it at any grocery store. 


  Third, while you don't need fancy equipment for these you will need a couple of madeleine pans. Don't fret about buying the most expensive gourmet ones you can get, I bought a couple of cheap non stick ones for about $10 and they work great. Do however pay attention to the size, most pans sold in the US are considered mini madeleine pans and it will affect how long you bake them. While a stand up mixer is not essential I highly recommend some electric beater. The eggs need to be whipped until they are foamy, thick and pale, it takes about 8 minutes in my stand up mixer on high to achieve this. While Julia Child asserted that this could be done with a whisk, by hand I honestly don't have the time or want for that kind of upper body workout , I'm not that domesticated or masochistic. A hand held electric mixer works fine, promise. 
  

  As I said before the recipe for madeleines is deceptively simple consisting of flour, sugar, eggs and some flavoring (good vanilla and lemon zest). They key is getting enough air into the eggs, I learned over time that you really have to beat the heck out of the eggs. If you are a visual person like me a good, quick tutorial can be found here it will give you a good idea of what your eggs should look like.

  My go to recipe is adapted from David Lebovitz's amazing recipe for Lemon-Glazed Madeleines. I suggest reading his post as it has some great tips. In the end it may be a labor of love, but home baked madeleines are worth it, when you master the art of making them you will never again find yourself at the Starbucks register with a package in hand.


Lemon Madeleines

  • 3 large eggs, at room temperature
  • 2/3 cup  granulated sugar
  • rounded 1/8 teaspoon salt
  • 1 1/4 cup  flour
  • zest of one small lemon
  • 1 tsp vanilla extract
  • 9 tablespoons  unsalted butter, melted and cooled to room temperature, plus additional melted butter for preparing the molds
1. Brush the indentations of a madeleine mold with melted butter and place in the fridge or freezer.
2. In the bowl of a standing electric mixer, whip the eggs, granulated sugar, and salt for 5 minutes until frothy and thickened. The eggs should be a pale lemon color and form ribbons when the beaters are lifted. (If you are unsure about how this should look see the tutorial linked above)
3. Spoon the flour into a sifter or mesh strainer and use a spatula to fold in the flour as you sift it over the batter. Be gentle, you don't want to push out all the air you worked so hard to get into the eggs.
4. Add the lemon zest to the cooled butter, then dribble the butter into the batter, a few spoonfuls at a time, while simultaneously folding to incorporate the butter. Fold just until all the butter is incorporated.
5. Cover the bowl and refrigerate for at least 3 hours. (Batter can be chilled for up to 12 hours.)
6. To bake the madeleines, preheat the oven to 375 degrees.
8. Plop enough batter in the center of each indentation with enough batter which you think will fill it by 3/4’s this is not an exact science. Do not spread it.
10. Bake for 8-9 minutes (less if you use "mini molds") or until the cakes just feel set. They are done when you press on the tops and they spring back. Do not over bake them, there is nothing worse than a dry madeleine.
11.  Remove from the oven and tilt out onto a cooling rack, brew a pot of coffee and grab a couple to dunk while they are still warm!

This recipe makes 24 regular sized madeleines or 48 "mini" sized. Madeleines don't keep well so they should be eaten the day of but can be kept for a couple of days in an air tight container, if they last that long!


Thursday, January 29, 2015

On Becoming Domesticated

  Anyone who knows me would die laughing at the thought of applying the term "domesticated" to myself. Lord knows that I am no domestic goddess, my kitchen sink almost always has a pile of dishes, washed and unwashed laying around, my bedroom floor is strewn with clothes, the bed is never made and I am completely content with the thin layer of dust that is ever present on my bookshelves as I believe that books are so much cooler when you pull one from a shelf and have to blow off a layer of dust before opening it. But somehow, by some strange series of events here I am.
  
  So how did this happen? I never had any ambitions of being a home maker. I am a nurse in a busy ICU, whose career choice is one of long 12 hour night shifts followed by a coma like sleep state the next day. There are no children that need to be cared for, cooked for or generally entertained, and I have a husband who is relatively undemanding. In fact a bowl of ramen noodles for dinner is met with as much enthusiasm as a perfectly cooked steak. I'm not sure how it happened but I know it did, perhaps it was partly self preservation. My husband for years was in charge of the cooking and other household duties while he was working on his degree. That all changed when he returned to the 9 to 5 world that I have no familiarity with and left me to fend for myself on the days I have off. I admit, I have been terribly spoiled over the years and have enjoyed great meals, now it's up to me to find food. But when did pie crusts made from scratch and home baked scones become the norm rather than the treat? In my case it came from the frustration of not being able to find an acceptable fast, off the self option and my stubborn streak. If I can't buy it then I'll make it dammit!


  So here I am, unintentionally domesticated.